Scrum Release Planning
Bridging the gap between roadmaps and sprint planning and resolving dependencies doesn’t have to be hard.
The secret is Release Planning.
This guide will briefly explain what Release Planning is, then walk you through how to conduct the event step-by-step. It’s suitable for both single teams, small groups of teams, and entire programs. You can extend and expand upon this guide as the complexity of your situation dictates.
What is Release Planning?
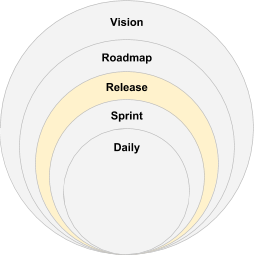
Release Planning is where the top-down Vision and Roadmap plans meet the bottoms-up Sprint and Daily plans in the middle.
Without Release Planning, we don’t have much information about whether or not we will be successful in completing our near-term roadmap items in the desired time frame.
A release plan is not a commitment. Instead, it is simply a good-faith forecast. It is generated with far more detailed inputs and analysis than a typical roadmap plan. It also involves the whole team’s insight. As a result, it’s typically off by a factor of only 1.5–2x instead of 2–4x as commonly seen with roadmap plans.
A release plan helps the team identify possible dependencies and risks in advance so that they can be mitigated earlier.
A release plan also helps the team have a greater sense of the bigger picture strategy. This can make the work feel less like an endless slog of sprint planning meetings with no greater purpose.
As a side note, veteran Agilist Mike Cohn thinks that “Medium Term Planning” is a better term than “Release Planning” because teams can release as frequently as several times a day or as infrequently as every several sprints. I agree.
Useful Supplies for Release Planning
It’s technically possible to complete Release Planning with the supplies found in most offices. As with any project, however, having the right supplies for the job will make it much, much easier.
For instance, most offices stock generic sticky notes. Those work fine around the office, but they lose tack quickly. After a few rounds of moving them around on a wall they’ll no longer stick reliably. You’ll inevitably find that your entire release plan is literally falling apart.
Should-have
- Fine-point Sharpie® markers (1 marker/participant plus spares): Markers are much easier than pens to read at a distance. Sharpie markers are reliable and last a long time.
- Yellow 5” x 3” Super-Sticky Post-It® Notes (1 pack/team): Chances are, you’ll be be writing dozens of backlog items on sticky notes, so stock up on this size and color. This is a good size for this purpose. The super-sticky notes hold their tack much longer than generic sticky notes, so this is a worthwhile investment.
- Multi-colored 5” x 3” Post-It® Notes (1 pack/team): 3M only makes their 3”x5” Super-Sticky notes in canary yellow, but you’ll probably want different colors of stickies to reflect different types of backlog items. There are also other brands of super-sticky notes that may come in different colors, but I’ve not tried them. Choose the color family you like most.
- Multi-colored 8” x 6” Super-Sticky Post-It® Notes (1 pack/team): This size works well for indicating epics. If you’re using a foam-core board for your release plan, you can also use these for your sprint dates, velocity/throughput, and capacity indications.
- Color-coding dots (1 pack/team): You can get these in a variety of sizes and colors. I’ve not tried this particular set, but I like the size and wide variety of colors for tracking all sorts of dependencies. I normally see these in use but there are only 4 colors and the yellow is hard to spot on yellow sticky notes.
Could-have
- Multi-colored 2” x 2” Super-Sticky Post-It Notes (1 pack/team): This size works well for calling out miscellaneous dependencies or other flags on user stories.
- 4’ x 8’ Foam-core board (1–2 boards/team): If you’d like to move your release plan from the conference room to your work area—either to simplify entering things in JIRA or keep it as an up-to-date information radiator—foam-core boards work best. They’re huge, so they’re expensive to ship. Look around locally for the best deal. If you’re careful with them, you can easily re-use these for a long time.
- Super-Sticky Easel Pads (1–2 pads per room): Provides additional writing space for schedules, risks, etc. They’re also an alternative to foam-core boards, but due to their thinness and small size, they can be a real hassle to work with. Be sure to get some drafting dots if you take this approach.
- Drafting Dots (1 pack/team): These are ~1” circles of masking tape that dispense quickly. They work great for holding runaway sticky-notes in place. They also work well if you’ve printed your backlog items on paper. Although nothing’s perfect, these are generally pretty gentle on painted surfaces and foam core boards, especially when they don’t stay up there for too long.
- Blue painter’s tape (1–2 rolls/team): Thin painter’s tape works well for drawing lines on foam-core boards. Probably fine for short-term use on walls, but probably not a great idea to use on whiteboards.
- Technician’s Tool Pouch (1 pouch/coach): It sounds silly, but some of the best coaches I know wear one of these when facilitating events. They can hold markers, sticky notes, and even rolls of tape. You’ll always have what you need immediately at hand when things are busy.
- Digital Camera (1 per room): Phones generally work fine, but a high-quality, high-megapixel digital camera can make photos of your release plan easier to read when you review them later.
Step-by-Step Release Planning Instructions for Scrum Teams
Step 0: Prerequisites for Release Planning
Before you begin release planning, you’ll want to have these prerequisites in order for each team participating in planning:
Must-have
- Travel and accommodations
- Known release planning window (typically 2-4 months)
- Key milestones and dates
- Product vision and roadmap
- Alignment with stakeholders on what you hope to work on during this planning window
- Known, stable team roster
- Enough right-sized, well-formed backlog items to cover the entire planning window (Acceptance Criteria not required)
- Definition of Done
- Adequate architectural and design runway
- Calculate historical velocity
Should-have
- Discuss the Trade-off Matrix with your stakeholder and choose which of scope, schedule, and resources will be fixed, firm, and flexible
- Write backlog items on sticky notes in advance (see step 5)
- Prioritize backlog items (or at least know their MoSCoW)
- Call out dependencies if known
- Definition of Ready, Working Agreement
- Ask team members to plan PTO through the release planning window in advance to extent possible
Could-have
- Build a story map
- Estimate backlog items in advance
- Have refined backlog items that meet your team’s Definition of Ready (this will make your release plan more accurate, but the time it takes you to do this may be wasted if your plans change)
Step 1: Create the Board with Sprints and Dates
Make your white-board or foam-core board look like this:

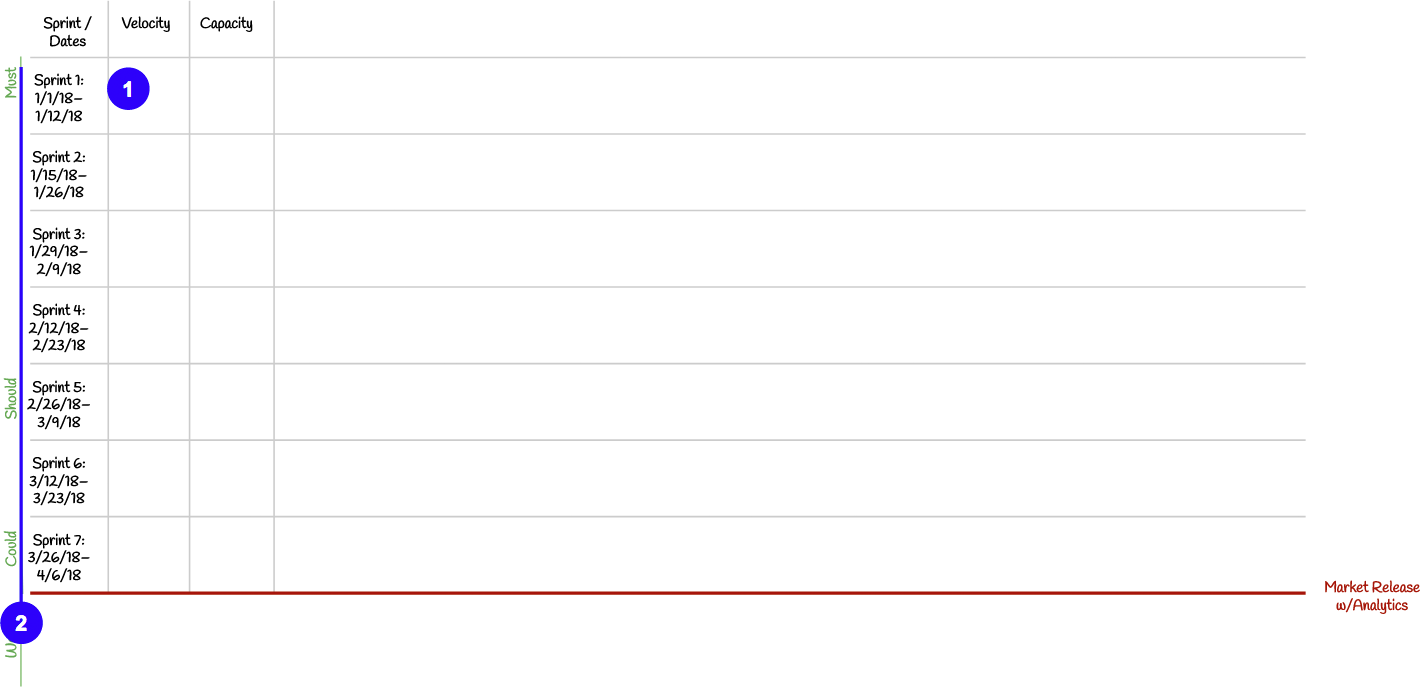
- For each sprint, indicate the sprint number, start date, and end date.
- Plan as many sprints as you like. Fewer than 4 sprints isn’t particularly useful, more than 8 takes too long for many teams. Many programs find it useful for every team to plan together once per quarter.
Tip: If you do this on one or more 4’ x 8’ foam-core boards, you’ll be able to move your release plan to your team area after release planning. This makes updating your backlog items and release plan in your Agile software easier. You can also keep this physical board up-to-date so that it acts as a physical information radiator for other teams and stakeholders.
Step 2: Add In Your Features, Epics, and/or Activities
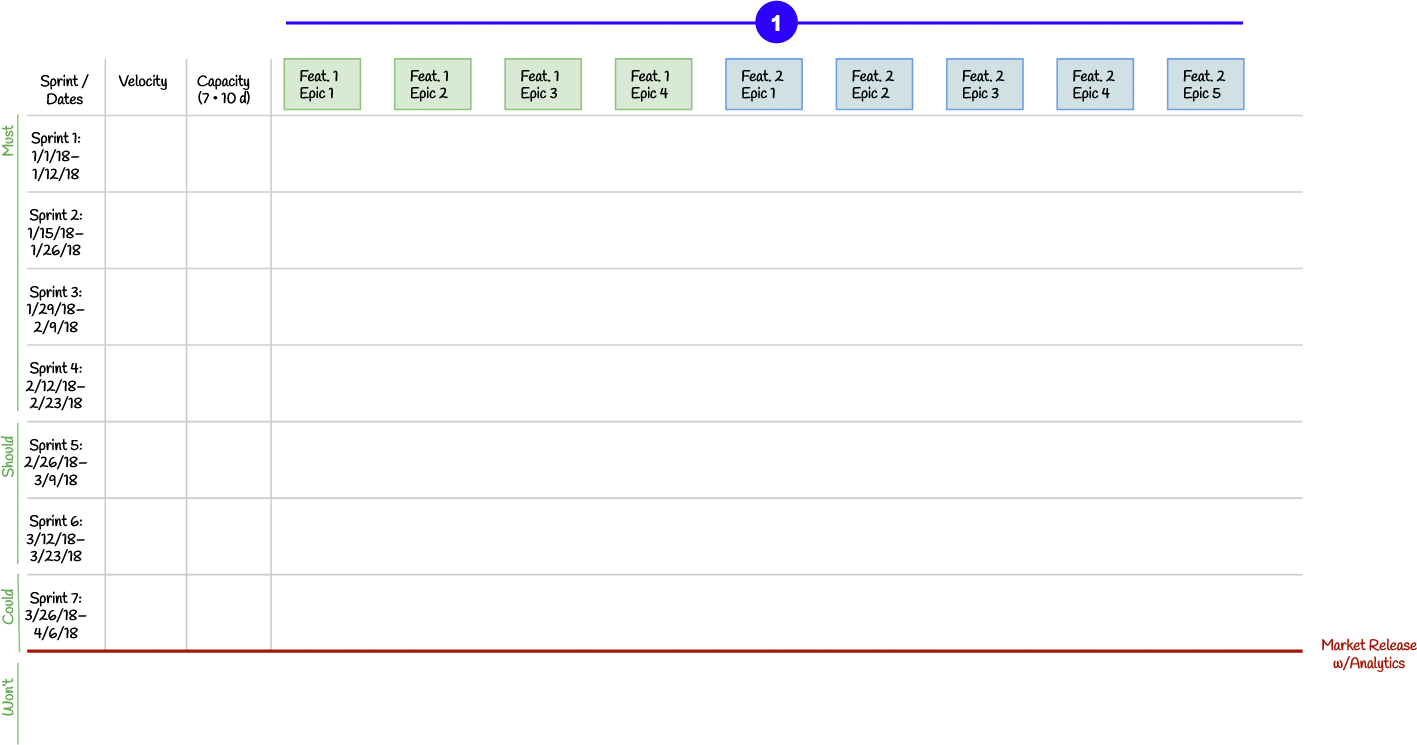
- Add sticky notes at the top of your release plan for each epic. It can be helpful to color-code these stickies based on the feature it relates to. Alternatively, you can use the sequence of activities from your story map.
Step 3: Determine Capacity
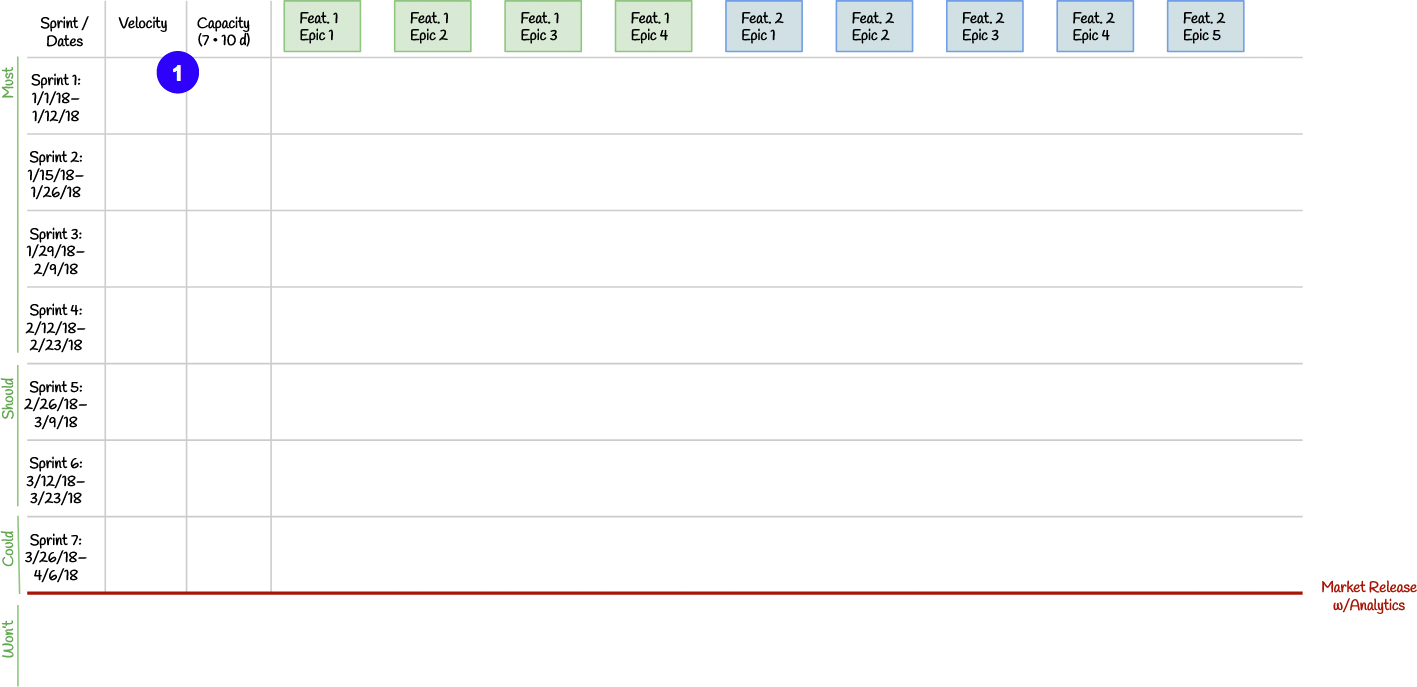
- Your default capacity is the number of full-time developers (including user experience researchers) on your team, times the number of days in your sprint. This team has seven developers and is planning two-week sprints, so their capacity is 70 days per sprint.
Tip 1: Yes, it’s true that your development team will spend about 10% of their time in Scrum events. It’s not usually worth calling this 4.5 or 9 days as this statistic is used in a scaling function for velocity and the additional 10% of precision is well within your estimate margin of error.
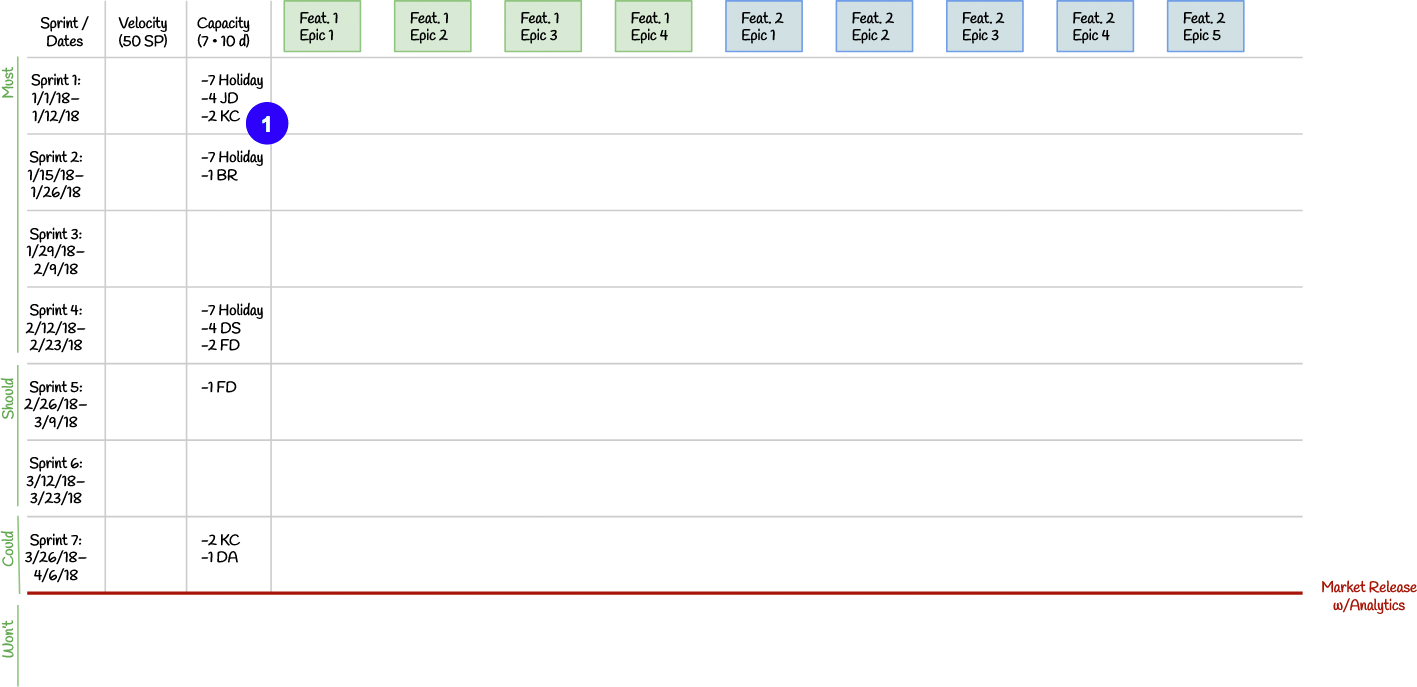
- Now, subtract capacity for each holiday, off-site (or similar), and expected PTO day. In Sprint 1, we have the New Year’s Day holiday, which means we are deducting 7 days as all 7 developers will take this day off. JD is taking the rest of the first week of January off, so we’ve deducted another 4 days. KC expects to take a couple of days off in the second week.
We don’t have currently any offsites planned in this Release Planning window, so they won’t appear on the release plan.
It’s perfectly OK if not everyone knows the exact PTO days they’ll be taking off in the Release Planning window. This plan is a forecast—not a commitment—and will inevitably change as time goes on. Do the best you can with the data you have today.
Step 4: Determine Velocity for Each Sprint if Historical Velocity is Known
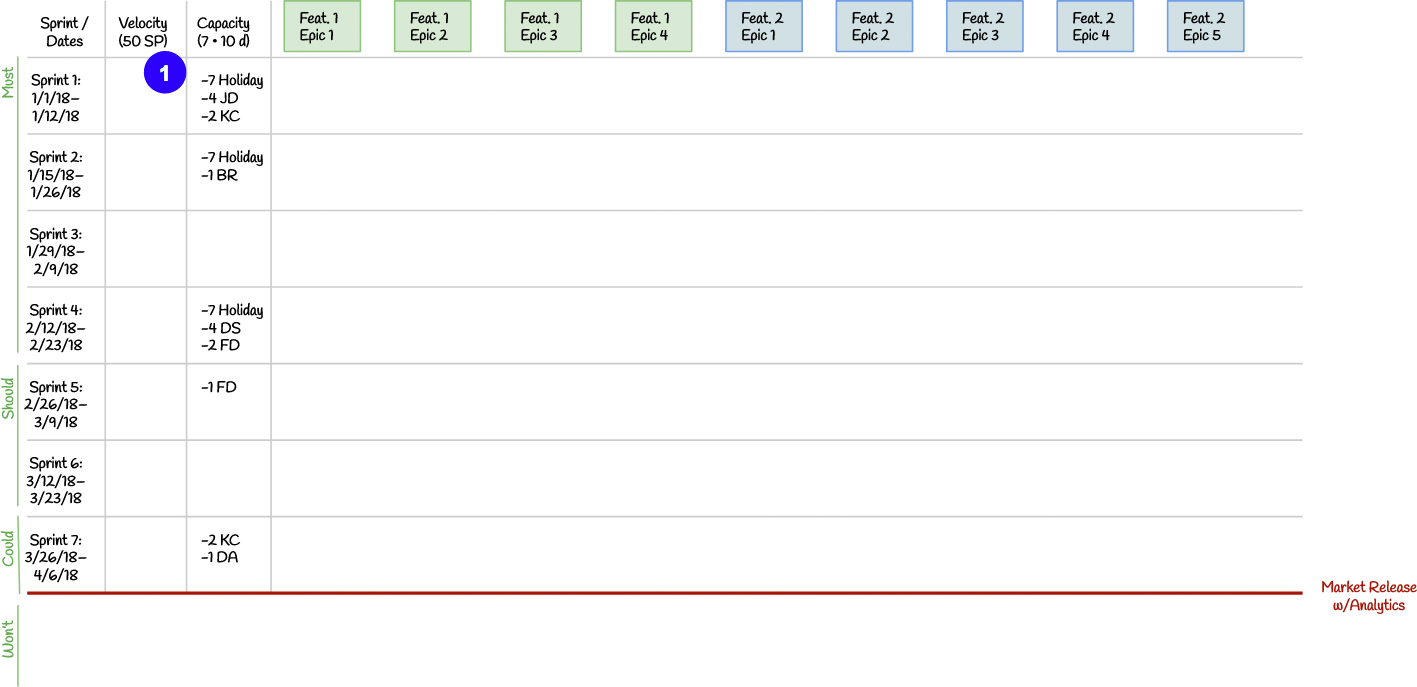
- Calculate your historical velocity at full capacity based on the last 3–4 sprints. Even if you have only 1–2 sprints, this will be better than nothing.
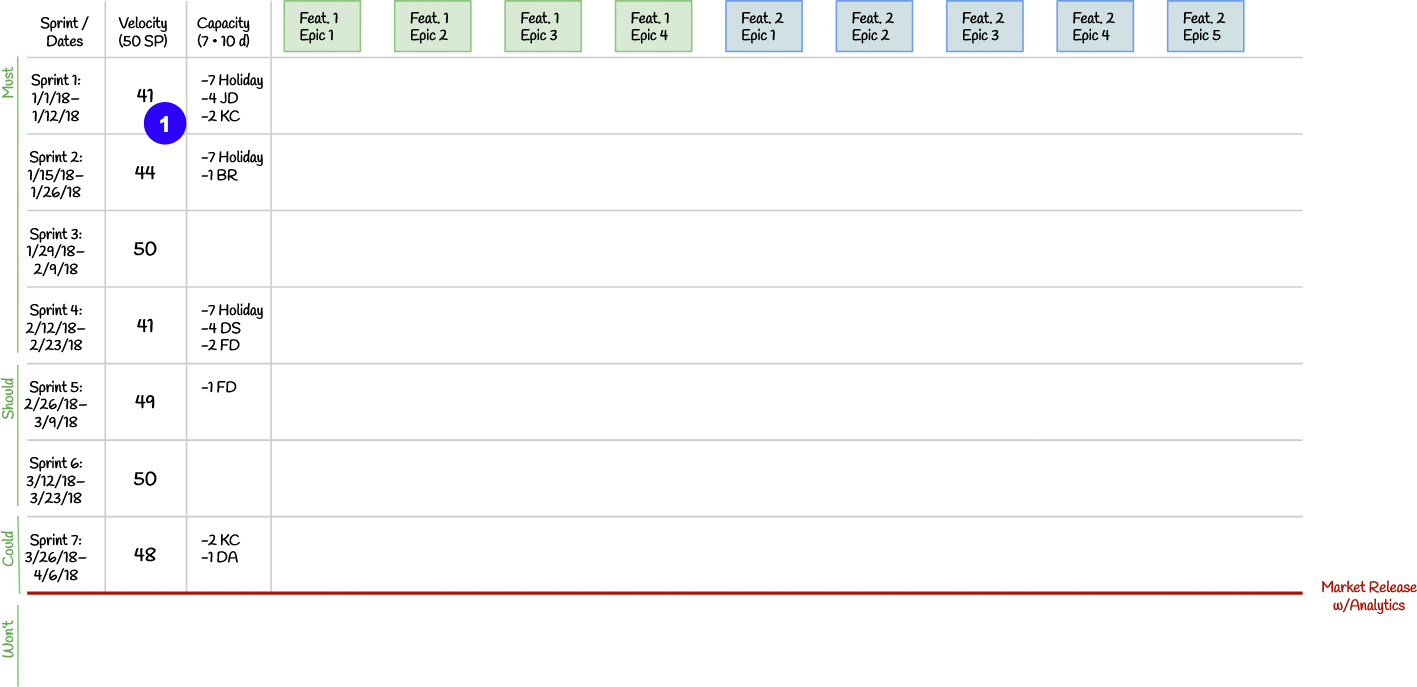
- For each sprint, calculate the expected velocity, adjusted for capacity.In this sprint, our effective capacity is: (70-7-4-2)/70 = 57/70 = 81%.
We then multiply the full-capacity velocity by the effective capacity, then round up or down. Thus our velocity is: 50 * 81% = 40.5 ≅ 41 story points.
Step 5: Write Backlog Items on Stickies
(The product owner should do this earlier, but now’s the last possible moment.)
Using fine point Sharpie® markers—(not pens, they’re much harder to read at a distance—write backlog items on individual 3” x 5” sticky notes:

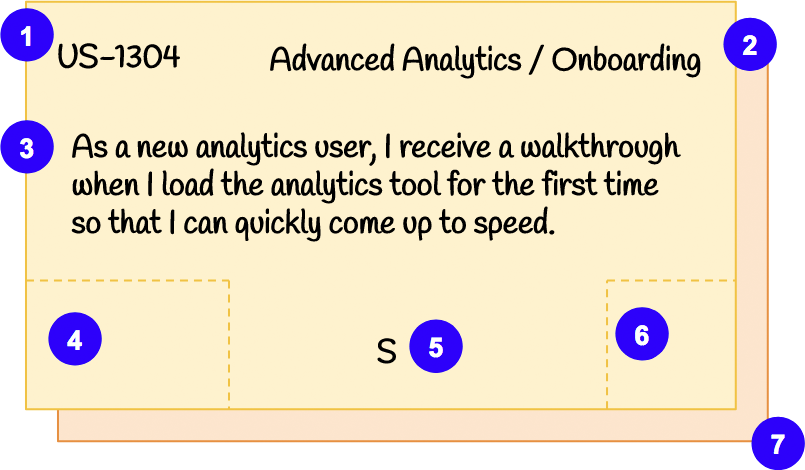
- Write the backlog item number from JIRA if you’ve got it. Don’t waste your time writing the prefix if it’s consistent across all items.
- Write the Feature and Epic in the corner if the backlog item is associated with one. Acronyms and shorthand are fine.
- Write backlog item’s title. In this case, this is a well-formed user story. Note that it doesn’t have to meet the Definition of Ready or have fully-defined acceptance criteria yet.
- Leave about a square inch or two in a bottom corner to write the story point estimate later. You don’t need to draw a box, just reserve some space.
- If your product owner knows in advance, it can be useful to note a backlog item as a Must-, Should-,or Could-have. This is a Should-have. This makes loading items into sprints later easier.
- Leave about a square inch or two in the other bottom corner to indicate dependencies with a label or acronym.
- You can use different-colored stickies to indicate different types of items if it’s helpful. In particular, I like to use a different color for functional spikes (design, UX, etc) because they generally rely most on a single user experience researcher. This can help prevent someone from getting swamped if the items are otherwise within the sprint’s point budget.
Tip: 3M® Post-It® Super-Sticky notes work so much better than the generic ones typically in an office that the price difference and effort to obtain them is well worth it. Otherwise, your sticky notes are almost guaranteed to start falling off the wall during release planning unless you tape them up. This lesson is hard-learned.
Leave A Comment